
|
“What’s the advantage of a wet-pipe fire sprinkler system over a dry-pipe fire sprinkler system?” If you’ve been in the industry a long time you might scoff at the question, but I’ve been asked a couple times from different non-fire protection clients. Grab a pen real quick. Identify all the reasons why we don’t do dry systems everywhere. Seriously – see how many you come up with. If you only said cost – you hit the big one. Dry systems are more expensive than wet. But there’s more to it than that. A lot more. Here’s my reasoning why dry-pipe systems are more challenging than wet systems. Compare it to your list and post your thoughts below in the comment section here. 1. Cost The biggest driver (as is with much in construction) for wet over dry is the cost. Cost is impacted by - the inclusion of a dry valve, - air compressor (or nitrogen generator) - potentially different pipe types - additional labor to design and install sloped pipe - inclusion of a remote inspector’s test - potentially additional low-point auxiliary drains with drum drips, and - use of dry-pendent style sprinklers in unheated areas 2. System Configuration With wet systems, we’re able to design tree, looped, or gridded sprinkler systems. Dry systems are limited to tree or looped systems (NFPA 13 2002 7.2.3.5, 2007-16 7.2.3.10, 2019 8.2.3.10). Gridded systems specifically can be great for bringing down branch pipe sizes by distributing the flow across mains and gridded branches. With more pathways to flow, there’s less overall friction loss from supply to sprinkler. Looped systems can benefit from a similar premise, but looped systems don’t benefit from flow down gridded branch lines. Looped systems with long branchlines can still have larger branch pipe diameters. 3. Slope Dry systems must slope to a drainable location (NFPA 13 2002 8.15.2.3.1, 2007-16 8.16.2.3.1, 2019 16.10.3.1). All dry system pipe must be sloped. For large or complex areas, these slopes can add up over time and result in big differences in pipe elevation. I worked on a pre-engineered metal building once which was several hundred feet long. We originally planned for a dry system due to a large exposed material storage overhang at the end of the building.  The three pipe slopes that appear in NFPA 13. Non-refrigerated mains require 1/4-inch per 10 feet slope, while branches and any refrigerated locations require 1/2-inch per 10 feet slope (NFPA 13 2002 8.15.2.3.1, 2007-16 8.16.2.3.1, 2019 16.10.3.1) The slope on the main from one end of the building to the other resulted in a difference of about 8-inches in height. Even splitting the difference and sloping to a high-point in the middle of the building was too much height difference for the building. We were trying to stay tight to structure and above wide overhead doors. The pre-engineered building had such little elevation tolerance (it was intended to house commercial trucks) that the slope on the dry mains were causing issues. Long story short – the slope of the pipe caused enough issues that the design of the building was shortened by six feet to accommodate dry sidewall sprinkler throws and not need a dry-pipe system. Keeping the entire system wet allowed level main runs and reduced overall cost to the project. It may be the only project I ever work on where the building size was adjusted to accommodate sprinklers, but it resulted in a much more cost-effective solution. See more about pipe slope in a prior article here. 4. Corrosion Dry systems suffer accelerated corrosion compared to wet-pipe systems. Those who inspect or replace dry systems know that their expected lifetime can be as short as a few years to as long as about a decade. Why do dry systems corrode faster than wet? They have more oxygen molecules introduced to the interior pipe network than wet systems do. A combination of water vapor (from originally filling the system, trapping water, or introducing moisture through air compressors) and oxygen will corrode the system. Wet systems suffer the same, but in much smaller quantities. In wet systems oxygen is only introduced from trapped water when the system is drained and refilled, or within the fresh water to the system. 5. Pipe Types Some specifiers differ in pipe specifications between wet and dry systems. Many do not, but some do. While galvanized pipe is no longer a standard for dry systems in the industry (and for good reason), dry systems may necessitate schedule 40 pipe to slow the progression of corrosion in the system. Pipe wall thickness not only affects cost and time to install, but it affects hydraulics too. 6. Hydraulics Speaking of hydraulics, dry systems require a 30% increase in the remote area (NFPA 13 2002-16 11.2.3.2.5, 2019 19.3.3.2.5). The system essentially must accommodate a larger fire because a fire has the ability to be larger in size before the sprinkler system can introduce water. This 30% increase in the remote area results in significantly more water and often larger main size than a similarly designed wet system. Additionally, NFPA 13 requires that dry-pipe systems use a Hazen Williams C-Factor of 100 in lieu of 120. While this may change in future editions of NFPA 13 when paired with nitrogen inertion (as UFC criteria has), it’s still currently only 100 (NFPA 13 2013 Table 23.4.4.7.1, 2016 23.4.4.8.1, 2019 27.2.4.8.1) for black steel. This higher friction loss can also result in larger pipe sizes. 7. Dry Pendents Not all sprinkler types are allowed to be used in dry systems. If a pendent sprinkler is located in an area where the return bend is not kept above 40-degrees, then it must be a dry pendent (NFPA 13 2002-16 7.2.2, 2019 8.2.2). Dry pendent sprinklers are significantly more expensive than a traditional pendent sprinkler, and introduce other manufacturer requirements (minimum shaft length, insertion into tees and not elbows). 8. Remote Inspector’s Tests & Drum Drips Wet systems can locate inspector’s tests (included to show water flow and test the waterflow switch) just past the flow switch as a riser. Dry systems, however, require that an inspector’s test be located at the most remote point of the system (NFPA 13 2002 8.16.4.3, 2007-13 8.17.4.3, 2016 8.17.4.2, 2019 16.14.2). This accessible valve at the most remote portion requires more pipe & coordination than a test at the riser often does.  Remote Inspector's Test (and drain shown here) come with an assortment of requirements. See a full detailing and breakout of the Inspector's Test here. Summary
We use dry systems when we need to accommodate temperatures less than 40-degrees (F). Much of the time there isn’t a choice between a wet and dry system. Some applications, though, could go either way. Early in design is often a great time to discuss heating options for spaces throughout a building. While the difference between 30 and 50 degree setpoints may not have major ramifications mechanically, it can have a major impact on the design of the suppression system. Your Thoughts What impacts have affected your projects the most? Comment below here. If you've found this helpful, consider subscribing here and sharing with a colleague. Thanks & have a great week! In my regular code calls I used to include a specific question on the use of clean agent systems in server rooms.
Building Owners & Sprinklers Many building owners provide clean agent systems to extinguish fires in high-value content areas, such as server rooms, data centers, archival storage, and many other applications. When the owners voluntarily pony-up for extra protection in these areas, they often ask whether sprinklers have to be installed in those spaces at all. My Code Call Question On my code calls, my question would go something like: “does your jurisdiction require sprinklers to be installed in rooms which are protected by a clean agent system?” I would get a mixed response. Some jurisdictions considered clean agent systems to be an equivalent for sprinkler protection, others would not. A couple years after asking this question on every applicable project I had a fire marshal shoot me straight. “If you don’t have sprinklers in the room, you don’t have a fully-sprinklered building. Check the IBC.” This was news to me. I was under the impression that use of clean agent systems could be used as a substitute for fire sprinklers and still be effectively “fully-sprinklered”. Back to the Book There is a path for this approach – the International Building Code (2018) Section 904.2 states that: “Automatic fire-extinguishing systems (ie: clean agent) installed as an alternative to the required automatic sprinkler systems of Section 903 shall be approved by the fire code official.” This was the foundation on which I had been asking the question. The big kicker was the code section just a paragraph later: “904.2.1 Restriction on using automatic sprinkler system exceptions or reductions. Automatic fire-extinguishing systems shall not be considered alternatives for the purposes of exceptions or reductions allowed for automatic sprinkler systems or by other requirements of this code.” Outside of the lawyer-phrasing, this section simply states “no sprinklers in the room – no sprinkler reductions or exceptions for your building.” The commentary by the International Code Council goes further, stating that while the authority has the ability to approve alternative systems in lieu of sprinklers, doing so invalidates the “fully-sprinklered” status of a building. Why Does this Matter? Why is this important? There is a long list of code kickbacks that sprinklers offer a building. A couple months ago I diagramed a cheatsheet for all of the major code benefits a “fully-sprinklered” NFPA 13 fire sprinkler system offers. You can download it free here. Code benefits include allowable building heights, building areas, number of stories, egress benefits, passive rating reductions, Draftstopping reductions, fire alarm reductions, and a handful of other benefits. I realized after that code call that the question affected well more than just my isolated “fire sprinkler” silo. Omitting sprinklers in just one server room would have code implications throughout the complex. Now, should building owners ask about omitting in these rooms we often look at other strategies – such as concealed sidewall sprinklers, use of dry sprinklers, drip pans, use of pre-action systems, or piping without joints and heavy-duty cages. Some of these solutions can be painless, without great cost and satisfy code as well. Want more like this? Subscribe to the blog here. Already subscribed? Send to a friend. Thanks for reading!
I was asked recently for a specific project how much flow the owner should anticipate coming from a building's main drain.
There's just a few factors that play into exactly how much water to expect. Is the drain serving as the main drain for a system? Is it only serving an inspector's test? Is the drain off a 1-inch pipe, or 2-inch? How much pressure is on the system? These aren't often difficult to answer if you're familiar with the job, but each of these answers plays a role in determining how much water will come out of an open orifice. This week I've simplified a few of these parameters to come up with a quick inspector's test and drain calculator for fire sprinkler systems. With it, you can estimate the amount of flow that will come from an inspector's test (use the k-factor option) or from a drain (diameter option). For our international audience I have incorporated real units from the get-go this time. It's a free tool that's now live on the site, here. Give it a spin and let me know what you think in the comments here. Know others that might find this helpful? Send them a link or tell them to subscribe here. Thanks & have a great week! Over a year ago I released a Thrust Block Calculator online.
It that takes a small handful of inputs and offers sizing and dimensions according to NFPA 13. The tool has been a reasonable hit except for one repeated request from the field – the thrust block weight. Until now designers and engineers using the tool still had to convert the minimum required volume into the minimum weight based on the density of the concrete. Hand calc no longer! Special thanks to Sinisa who offered the reminder after I asked for pet peeves or upgrade requests in last week’s post. If you’ve never used the tool and would like to check it out, here’s the link to it. It's free and available now. Last item for this week - I'm circling back to a call for water storage tank experts. If you're experienced in this space and would like to review a new tool I'm working on, please shoot me an email at [email protected]. Would be happy to set up beta testing. Thanks and I hope you have a great rest of your week! If you know someone taking the PE Exam this week, it's time to give them a hug. Maybe not an actual hug; don't be a creeper, but maybe a kind supportive attaboy wouldn't be a bad idea.
Final Call for the PE Exam This Friday is the day for the 2019 Fire Protection PE Exam... the same exam that at least two hundred fire protection professionals have been honing in on the past few months. Changes Coming This year marks the last year of the written examination. Major changes are on the horizon for the Fire Protection PE in 2020, including question style, references, and going to a computer-based environment. The biggest change may be that no longer will any resource be allowed in the exam room. There'll be plenty to cover on the 2020 exam later on. Perhaps because of the big looming changes, we've seen a major uptick around here in the interest in the Fire Protection PE Exam. I would guess that this year will set the record for the number of examinees. That's a great thing. I'm thrilled that the fire protection industry as a whole is growing, and I hear almost weekly about how rare Fire Protection Engineers are in our industry. What is the PE Exam? For those who don't know, the PE Exam is the Principles and Practice of Engineering examination which is administered by the National Council of Examiners for Engineering and Surveying (NCEES). The exam is the major milestone to getting a license to practice as a Professional Engineer in the United States. In order to take the PE Exam, examinees must typically first complete a four-year ABET accredited engineering program and a Fundamentals of Engineering (FE) Exam as well as accruing four years of experience working with a licensed engineer. Of course the requirements vary by state but that is the most common requirement. Last Minute Exam Advice If you have a copy of the Prep Guide you already know there's quite a bit of detail on exam advice passed down through the years included in the book. Regardless of how many hours you've spent studying (whether two or two hundred), there will always be topics that are over-emphasized, poorly worded questions, and niche questions that seem to have no basis in any reference materials. Keep calm and exam on! Skip and come back to questions later. Some of these questions are just on trial for future exams and others will get disputed and thrown out. All you can do is your best. Don't worry about surprises you can't control but focus on what you know and give it your best effort. Best of luck, you've got this! Updates for 2020 PE Exam If you have sent in information on the 2019 Edition for suggestions or potential updates, thank you! With all that's happened around here this summer I haven't been as responsive to PE Exam emails as I've tried to be in the past. Please know that I go through all of these and make updates for future examinees, and I greatly appreciate your time in sending suggestions in. New Feature on Quick-Response Remote Area Reduction I've had a pet peeve about one of my own tools. Awhile back I created a calculator that will determine the allowable reduction in the hydraulically remote area based on the use of quick response sprinklers. It's a quick-hitter and one I use often. Each time I use it, though, I still end up using the reduced area and punching in 1.2 times the square root of the new area in order to lay out my hydraulically remote area. Being that I'm all about convenience (ie: laziness) and efficiency, I've now added that basic calculation in the tool as well. You can see the new feature here. If you have similar nuances on how these tools can be improved, let me know! I'm always happy to entertain new ideas. You can always reach me at [email protected]. Have a great week! I'll come out and say it. I’m a millennial. I like to think I can opt out of millennial status voluntarily, but I'm told it doesn't work like that. Technicalities… I like to think that the relentless pursuit of finding better & faster ways to do better work is about innovation and constant improvement. I guess it could also just be considered finding ways to avoid work or wanting the "apps" to do any real engineering. Today's post covers one of my favorite cheats on checking site elevations and distances. It's super easy and a major benefit when setting up or reviewing hydraulic calculations. On a side note I'm also told that the kids these days call these "hacks". I'm told that a "hack" is a good thing, so I'll roll with it. Besides - age is just a state of mind, right? I'm cool, I promise. Just don't ask my kids. Here's the “hack” - just follow these steps: Get Elevations Between Any Two Points 1. Open Google Maps (https://www.google.com/maps) 2. Enter or zoom in on any address. 3. Right click on any location you wish to get an elevation on. Select "Directions to here" 4. Now right click on any location at least a block away, such as your tap for the building's water connection. Select "Directions from here" 5. Now you'll have opened up the directions dialogue. Instead of car directions, click on the walker icon in white at the top. 6. Click on the very bottom description in gray. It often reads “Mostly Flat”. This opens up an elevation view from your original point (such as your building’s water tap) to your building. This shows your end elevation (against sea level), your original elevation, and the elevation difference between the two. Measuring Site Distances While still in google maps, you can also get distances on a site.
Here's a video showing both (click this link if you don't see the video): So What? Earlier this year I had a project I was reviewing which showed no elevation difference between the flow test and the base of the project. The pipe distance was roughly accounted for, but no elevation. I checked the test distance on Google Maps and despite only being several hundred feed from the project, the test was at an elevation 32 feet lower than the base of the project. Did this affect the hydraulic calculations? It absolutely did. The calculations went from having 6 psi safety to being 8 psi over the available water supply. The measurement tool comes in handy for many projects where site plans are not prepared. This doesn't come up quite as much in new construction, but certainly for retrofits or projects with no site work - a site plan often isn't available. Use of quick measurements can give some guidance towards using conservative measurements for hydraulic calculations. If you already knew these two tricks, congratulations, you’re probably also a millennial. If you didn’t, and would like to send money for the gobs and gobs of time these simple tools will save you in the future, please make the check out to “Joe’s Beer Fund.” Actually better yet – just tell another friend about this site. It is always very much appreciated! Hope you have a great rest of your week. Last week I discussed a common question in residential construction concerning whether NFPA 13R could be used, or whether NFPA 13 had to be used. If you haven't read it, you might check it out. Here's a link. The four global limitations to using NFPA 13R include:
The last qualifier is often the most difficult to assess, and is an important question that the architect or code consultant for the building will need to answer. To help determine whether a building can use NFPA 13R, here's a PDF cheatsheet that shows differences in code allowances using NFPA 13, 13R, 13D, and no protection at all.  All of the references are to the International Building Code 2018 Edition, but this should help offer some quick guidance on different code allowances to check for your project. As always, it's worth using this as a starting point and then exploring the code nuances to be sure your project is up to snuff. If you haven't already subscribed - you can do so here. This blog is all about promoting best practices in fire protection by providing tools, resources, and helpful articles. Other Notes Travis Mack at AFSA If you're going to AFSA's Conference in San Diego next week, be sure to check out Travis Mack's presentation on this topic. He's an industry leader & expert in everything suppression. Correction on the Porte-Cochere Logic A couple weeks ago I discussed the differences between different forms of heat transfer in the context of flame spread. I made a point that conductive heat transfer is the least critical of the three forms of heat transfer, but suggested that fires "jump" across roadways due only to radiation heat transfer. This is due primarily to convective heat transfer - strong winds can promote fire growth far faster than radiative heat transfer can - and it often does for large wildfires. Prep Guide I mentioned last week - but I'm down to about a dozen copies of the 2019 PE Prep Guide Edition left for the year. If you know someone who is looking for a copy you might suggest they get it sooner rather than later. Thanks & have a great week! For the contractor clients I work with I regularly look over jobs pre-bid. I’ll review drawings, read specifications, and compile all my notes looking for red flags that could impact the job from a design standpoint. (The cheatsheets that I use to breakdown a job is now all in the Toolkit) Last month I reviewed an apartment complex job for a bid where the code summary had conflicts. The IBC Chapter 5 summary indicated and NFPA 13 system while the IBC Chapter 9 indicated an NFPA 13R system. There were no other references to a fire sprinkler system in the rest of the documents or specifications. These are the projects that I blame my hair loss on. It's another bad example of project documentation. Regardless, the question of NFPA 13 versus NFPA 13R is something that comes up regularly and is the topic of this and next week's article. Why Does it Matter? NFPA 13R is not built with the same intent as an NFPA 13 system. NFPA 13R systems are designed to “prevent flashover (total involvement) in the room of fire origin”. By doing so, they intend to improve the ability for occupants to survive a fire by evacuation. 13R design is primarily concerned with protecting areas of residential buildings where fires cause loss of life. It is not as concerned with fires in areas where fatal fires in residential occupancies do not originate. (Reference IBC 903.3.1.2 Annex) NFPA 13 systems, however, intend to provide a “reasonable degree of protection for life and property”. In a general sense, NFPA 13 systems are concerned with both life safety and property protection. The goal is to suppress a fire near its' point of origin, regardless of the level of risk to life safety.  Cost can be largely impacted by the NFPA 13 vs. NFPA 13R decision - especially in wood construction buildings with attic spaces and overhangs. Cost Impact Aside from having different purposes, NFPA 13 vs. 13R decisions can have major implications on system cost. NPFA 13R systems allow sprinkler omission in a handful of areas which 13 does not. These include small closets, exterior balcony closets, concealed spaces, elevator machine rooms, garages, carports, attached porches, and attic spaces. I've summarized these with a cheatsheet here. For wood-construction (a mainstay in residential design), attic sprinkler systems under NFPA 13 can command a major cost premium. These attic systems need dry valves, air compressors, use of steel in lieu of CPVC, special application sprinklers, and design requirements that can require large diameter pipe. Testing and maintenance is also a long-term ownership concern. Not only do dry attic systems require regular low-point drainage, but they often corrode faster than wet systems . Attic systems are one area of a building that can be a huge difference between NFPA 13 and 13R. That said, I’ve also worked on projects where 13R has little to no impact on the project price. A flat-roof building built with non-combustible structure, for instance, offers no major difference. The only impact was the lower density permitted for residential-style sprinklers. Using the 0.05 gpm/sqft in lieu of 0.10 gpm/sqft of NFPA 13 resulted in smaller pipe diameters for an NFPA 13R system.  Buildings must be residential, four stories or less, 60 feet in height or less, and not use any code exemptions for an NFPA 13 system in order to use NFPA 13R.
When Can I Use NFPA 13R? There are four global limitations where an NFPA 13R system can be used. These include:
"My project is design/build with deferred submittals. Can’t the contractor determine this?" No - and I can’t stress this enough – please do not leave this determination to a contractor. It doesn’t matter if you’re an architect, mechanical engineer, or the expert code consultant. There are a number of code exceptions that can only practically be determined by the design team. The sprinkler contractor is an expert on suppression – not on architectural design decisions and the code paths for those decisions. What are the building code exemptions that require an NFPA 13 system? The code exceptions show up for building height increases, building area increases, egress widths, travel distance limitations, occupancy separations, corridor wall ratings, hazardous material increases, inclusion of atriums, unlimited area buildings, allowable area of openings, vertical separation of openings, draftstopping, interior finishes, floor finishes, manual fire alarm systems, and several others. Sounds like a lot? It is. Fortunately I’ve got a cheatsheet coming next week where I’ll explore these differences in more detail. If you’re interested in getting a copy, subscribe here and it’ll be emailed directly to you. Other Thoughts A couple weeks I posted a link on this month’s sponsor Engineered Corrosion Solution’s whitepapers. Many of you have already checked it out, but if you haven't there's a MeyerFire welcome page here: https://www.ecscorrosion.com/meyerfire-welcome I had a couple people ask about the whitepapers, so here’s a direct link to them. Specifically, be sure to check out "Industry Myths Regarding Corrosion in Fire Sprinkler Systems" and "Six Reasons Why Galvanized Steel Piping Should NOT be used in Dry and Preaction Fire Sprinkler Systems." PE Prep Guide 2019 Selling Out There's been a ton of interest this year in the PE Prep Guide. I genuinely appreciate every single person who's checked out the book for this year's exam - there has been more interest than ever before and I suspect the exam turnout could be the most ever for the Fire Protection P.E. Exam. Next year's exam in 2020 will go computer-based and have major changes, so the PE Prep Guide will undergo big changes as well. This year's shipment of the 2019 Edition is just about out, and because of the big changes next year I won't be ordering extra copies. We currently have 16 copies available, so the 2019 edition will likely sell out by October's PE Exam. If you'd like to get a copy of the 2019 PE Prep Guide, please consider doing so now. After the 2019 Edition sells out we'll still have 2018 PE Prep Guides available, and I'll ship an errata list with it. Any questions, please reach out to me at [email protected]. Last week I discussed across a common misconception with porte-cochere sprinkler requirements and how code addresses sprinkler protection for these structures. This week I’m diving a little deeper with some estimates of how a porte-cochere fire would actually affect a main building, based on distance from the building. It’s important to note that this exercise is largely academic: with the calculations below I’m making some gross assumptions that overly simplify the situation. This has not been vetted with Ph.D. experts nor gone through full scale fire testing. I’m just running some basic numbers with big assumptions to illustrate a point. Heat Transfer From what science gives us - heat is transferred by three methods. Conduction, convection, and radiation. Conduction is the transfer of heat by objects touching each other. The direction of transfer is dictated by hot-to-cooler materials in direct contact. Convection is the transfer of heat caused by the movement of gas (or a fluid). The direction of transfer is largely dictated by overall movement of the fluid, and for smoke tends to be vertical. Radiation is the transfer of heat from the emission of electromagnetic waves. The direction of transfer is in all directions, but can reflect and re-emit from other surfaces. Heat Transfer for a Flame For a flame, depending on the fuel, most of the heat will be transferred away from the flame source primarily by convection. The chemical reaction (oxidation) of a flame will cause gases to heat. The heated gas’ molecules will become more active and less dense. With less-dense gas than surrounding cooler air, the warm gas will rise up and away from the flame source and carry solid particles forming hot smoke. Radiation will typically comprise 20-35% of the overall heat release rate for a fire. Radiation transfers heat from the source in all available directions until it contacts another surface. Once in contact with other surfaces, radiation can be absorbed or re-emitted from the surface, depending on the surface material. Conduction is the least important mode of heat transfer in an open fire. Radiation near a flame’s origin, for example, often emits and heats up adjacent surfaces with more impact than conduction. For wall assemblies, conduction of heat through penetrations becomes important, but for flames in open environments conduction plays only a small role. Three Porte Cochere Scenarios 100-foot Separation Now imagine a porte-cochere that is 100 feet (30 m) from the face of a larger main building to the center of the porte-cochere. If the porte-cochere is completely inflamed, how would it transfer heat to the main building? It would transfer heat only by radiation; and in very small amounts. Assumptions include a 5 megawatt (MW) fire from a wood-built porte-cochere, a 100-foot (30 m) center distance from the main building, an atmospheric transmissivity of 0.95, and a 30% of the overall heat loss as radiation. Using the Lawson and Quintiere Point-Source Method, the incident radiant flux (a measure of the heat energy per area) is 0.13 kW/sqm.  This radiant flux is about 10% of the flux for a 1st degree burn on unprotected skin. 30-foot Separation Now move the porte-cochere to be 30 feet from the face of the building. Radiation will again transfer heat to the face of the building, but in a much larger amount. Because radiant flux is related to the inverse square of the distance between the targets, this 30-foot distance will actually have a radiant heat flux 10 times greater than a porte-cochere fire 100 feet away. For the same size fire as before but at 30-feet, this could be about enough heat for a 1st degree burn.  At the 30-foot distance, however, heat transfer to the main building is still primarily by radiation. The hot, buoyant smoke is still primarily driven upward from the porte-cochere and would likely not reach the main building unless strong winds directed the hot gases. 10-foot Separation Now imagine this same porte-cochere, but this time centered only 10 feet (3 m) from the main building. Radiation heat transfer is now 10 times greater than the 30-foot distance, and 100 times greater than the 100-foot distance.  At only 10 feet from a 5 MW fire, the heat flux is enough easily cause 2nd degree burns for unprotected skin. Additionally, this heat flux is now approaching the critical heat flux for ignition of some building materials. The critical heat flux is the minimum amount of heat, per area, required to cause ignition. There's several factors that contribute to ignition including exposure time, material thermal properties, surface temperatures, and the actual heat flux versus critical heat flux - but for our purposes I'm only showing this critical heat flux for a couple siding materials. Wood, for instance, has been tested to have a critical heat flux of approximately 10 kW/sqm. Vinyl siding has a critical heat flux of approximately 15 kW/sqm (both values from SFPE Handbook of Fire Protection Engineering, Table A.35, 5th Volume). When we look at the heat flux already produced by a fire of this size at 10 feet we can see that we're already approaching the critical heat flux for both wood and vinyl.  Actual Separation
Now let's speak in practicality. Porte-cocheres are built to allow visitors to enter and leave cars without exposure to rain or sun. Is a 30-foot or 100-foot separated porte-cochere provide any value to a building? No, of course not. This exercise just shows that with reasonable assumptions, a 10-foot physical separation assuming a 5 MW fire begins to approach the critical flux needed to ignite a nearby building. Fire Size Would the actual fire be 5 MW? It's difficult to predict and will vary widely by the materials used and the shape it conforms. A point-source approximation is a large oversimplification given that a wooden canopy would burn in a very different configuration than a condensed pile of wood pallets, for instance. Convection What about convection? Up to now we've still only discussed heat transfer by radiation. If a porte-cochere is close enough to a building, convective heat transfer from the hot smoke will begin to contact the main building and heat surfaces along the face of the main building. This could also be aided by wind conditions as well. As I explored a little last week, a porte-cochere that is only separated inches or a couple feet from a building is hardly any different than a porte-cochere that's attached to the building. That's largely because of convective and radiative heat transfer. The further away the porte-cochere is, the less convective heat transfer plays a role and the lower amount of radiative heat will be transferred. Fire-Resistive Construction What if we create a firewall or fire barrier? Both would slow the spread of fire and help prevent the main building from burning. The International Building Code relaxes the physical separation with fire-resistive construction, and for good reason. Heat flux becomes much less important when the exterior is of non-combustible construction. Summary It can be easy to get lost in code minutiae and live by the black and white lines of what code reads. I find that it's important to remind myself about context about each building and where good engineering judgement plays a role in protecting buildings from fire. This overly-simplified series of calculations just shows the tiers of radiative heat transfer and how much it is affected by the separation distance. The further away a building is from another, the less convective heat transfer plays a role (if any) and the less radiative heat transfer occurs. If you found this interesting, let me know by leaving a comment here. Always happy to hear other opinions. If you don't already follow the weekly blog, consider subscribing here. Thanks for reading!
In February of last year I put together a flowchart that covered sprinkler requirements for exterior projections. If I had a Top-10 Articles list, it'd be on it.
If you haven’t read it,here’s a link to the original article. Porte-Cochere Updates Since I wrote this article and posted the original flowchart, I’ve received some encouraging feedback and thoughtful comments. I’ve updated the flow chart this week to address specifically sprinkler protection of porte-cocheres: 
What's a Porte-Cochere? First, because I have no idea where the term “porte-cochere” originated, I’m talking about the covered entrance where vehicles can pass through as part of an entranceway to a building. Not to point fingers, but I’m guessing the term “porte-cochere” was dreamed up by an architect to disguise the fact that they’re sticking a carport on the front of their building. Maybe it’s my Missouri roots, but what we’re talking about here are just fancy carports that can be driven through. Now stepping down from the soapbox… "If It's Not Touching the Building..." Stop me if you've heard this one before. One common assumption I’ve heard repeatedly from architects and contractors concerning porte-cocheres is that sprinkler protection isn’t required for porte-cocheres if they are not connected to the main building. Unfortunately, that's not justified by code. It is true that porte-cocheres, on their own, often do not require fire sprinkler protection. They will generally fall under a Type U (Utility and Miscellaneous Group) Occupancy, which do not require fire sprinklers by IBC 903.2. However, in order to qualify as a separate “building”, the International Building Code requires a physical space separation, a fire-rated separation, or a combination of both. In terms of a porte-cochere attached to a main building, the porte-cochere would be considered a separate building by any one of the following:
As an example, if the main building is a Type V-B (combustible construction), Residential R-2 Occupancy (such as a Senior Living facility with more than 16 people), then the minimum requirements for a porte-cochere as a separate building would be:
Applying Logic From a practical standpoint, what is the difference between a porte-cochere that’s six inches from the main building and one that is touching the main building? None. Zero difference. I’ll explore this from a scientific perspective in next week’s article, but in short - conduction heat transfer makes little difference in the spread of fire from one structure to another. Want to know why forest fires can “jump” across highways? It’s not because trees are locking branches above roadways – it’s because of radiative heat transfer. So why do we get so tied to the concept that if the porte-cochere isn’t touching the main building that it’s as if it doesn’t exit? I’m not sure exactly, but it seems to come up quite frequently. One Note on Concealed Spaces NFPA 13 has two separate sections that affect porte-cocheres. The first is protection below overhangs, canopies, & porte-cocheres. This article and the flowchart address this situation. The second section is protection within concealed spaces. If your porte-cochere does not require sprinkler protection per the building code, then no sprinklers are required regardless. If that's not the case, and your porte-cochere has concealed spaces within it, check out NFPA 13's Special Situations section to see if the concealed spaces require sprinkler protection. These may still be required to be protected even when sprinklers can be omitted below the ceiling. This show ups in Section 8.14.1 of the 2002 Edition, Section 8.15.1 in the 2007-2016 Editions, and Section 9.3.18 in the 2019 Edition. Losing the Forest for the Trees I sometimes find that when assessing code it is easy to lose the forest for the trees. Sometimes I can be so fixated on finding one specific answer that it is easy to step back and assess the ‘big picture’. Addressing overhangs and canopies can get that way. While I don’t always get the opportunity to address fire protection intent with a building owner, I have to keep in mind that code only prescribes the minimum requirements. We can always elect to improve fire protection & life safety above code minimum. Two recent local fires come to mind when looking at how sprinkler protection affects overhangs and how different owners were impacted very differently. The first fire occurred at an apartment complex when a tenant left a lit cigarette on the third story balcony of an apartment complex. The cigarette started a fire on the unprotected balcony, which spread into the apartment attic (without draftstops) and quickly spread across the attic of the entire building. The upper two levels were badly damaged along with the entire attic and roof needing replacement. Another fire occurred, more recently, at a three-story office with a porte-cochere. A car fire underneath the porte-cochere activated a single sprinkler which suppressed growth until the fire department arrived. The porte-cochere had smoke damage, but the fire had no impact to the main building. No downtime, no multi-million dollar rebuild. From the photos it was difficult to see any impact from just inside the main entrance. These are two different situations of course; the first likely an NFPA 13R and the second an NFPA 13 system. Nonetheless it raises the issue of making sure that we, as professionals, inform and have dialogue with the building owner to not just determine what code minimums require, but what levels of protection may serve them best. This Month's Sponsor I'd like to introduce this month's MeyerFire sponsor with Engineered Corrosion Solutions. They are experts in the corrosion space for fire sprinkler systems and have a long list of helpful resources on their website. As a side note, some of their original whitepapers and case studies were instrumental for me in my understanding of current corrosion challenges. When should we specify galvanized pipe? Is MIC or oxygen-induced corrosion a bigger concern? What can we do to stop corrosion entirely? They have it all here. Thanks to the ECS team for helping promote this site and supporting my efforts to develop new resources for the industry. Next Week Next week I'll explore the concept of porte-cochere separation distance, but from a modeling perspective. How much does the distance impact radiative heat transfer? How does convective heat transfer play a role? I'll explore this in more detail and from a calculated perspective next week. If you don’t already get these weekly articles via email, subscribe here. If you know someone who might be interested, please pass a link along. Thanks and have a great week! |

ALL-ACCESS
SUBSCRIBEGet Free Articles via Email:
+ Get calculators, tools, resources and articles
+ Get our PDF Flowchart for Canopy & Overhang Requirements instantly 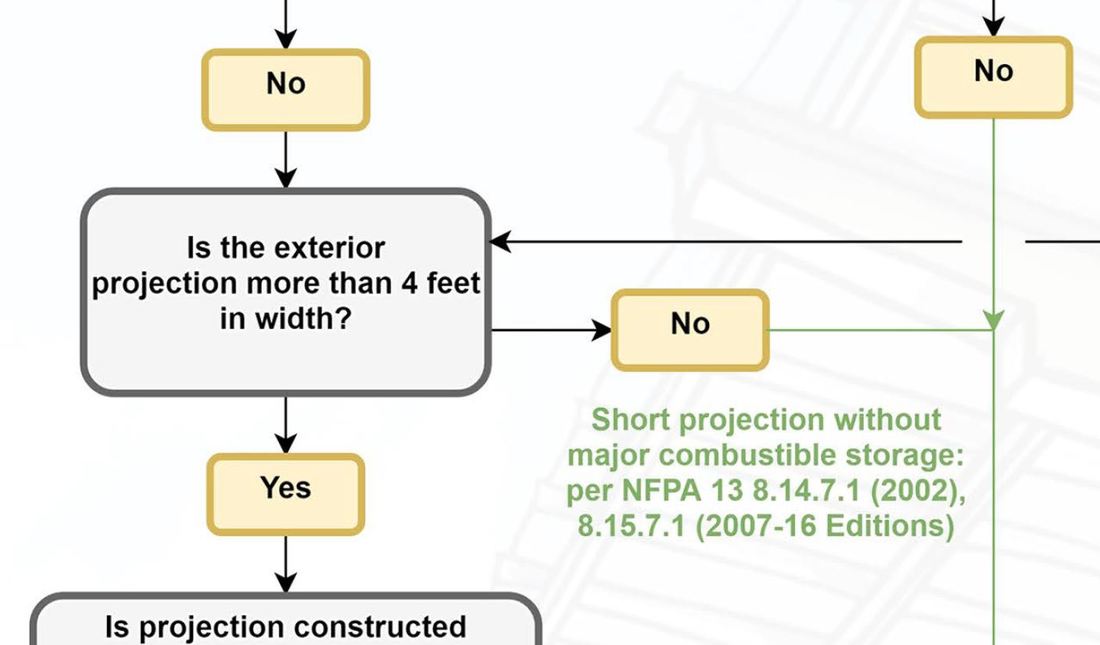
+ No spam
+ Unsubscribe anytime AUTHORJoe Meyer, PE, is a Fire Protection Engineer out of St. Louis, Missouri who writes & develops resources for Fire Protection Professionals. See bio here: About FILTERS
All
ARCHIVES
July 2024
|
 RSS Feed